Horizon360™ User Guide

Customers

This article will show you how to create and manage Customers in Horizon360. If you are using Quickbooks Online and prefer to import your customer list to Horizon360, check out the Quickbooks Cleanup Tips & Syncing Quickbooks Data articles. If you have an Excel file of customer data, check out the Company Settings article and jump to Import/Export Data.

Continue below to learn about managing your customers' information.
Jump to:

Adding Customers

1.
From the Customers section, click Add Customer.
2.
Select if this is a Residential or Commercial customer (Residential will require First & Last Name, Commercial will require Company Name or First & Last Name).
3.
Add the customer's Name.
4.
Add the customer's main Phone Number.
a.
Click Add Phone Number to ad an additional phone number for this customer
5.
Enter an email address for this customer.
a.
Select whether this customer should receive email notifications from you or not (email communication available with the CRM add-on or the Unlimited tier).
b.
Note: You must receive confirmation from your customers that they wish to receive emails from you. All emails will include a link for your customers to unsubscribe, which will toggle the Email Subscribed to Off if a customer unsubscribes.
6.
Select whether this customer is enabled to receive invoices directly through Horizon360's in-house payment processor.
7.
Select whether this customer is Tax Exempt (this option will prompt Horizon360 or QuickBooks to include or omit taxes when invoicing this customer).
8.
Select how often you wish to Invoice this customer; either a pending invoice every time a job is completed, or one invoice with all completed jobs itemized on a set frequency (i.e. weekly, biweekly, monthly, etc.)
9.
Enter the customer's Billing Address.
10.
EnterAdd any customer-specific notes you may need to be aware of when creating jobs the customer's Billing Address.
11.
Click Save to start setting up the Service Address information.
12.
Select if the Service Address is the same as the Billing Address (if not, enter the service address).
13.
Select the priority for this customer (jobs with high priority will be added at the beginning of the route when building routes).
14.
Select how you wish to apply the Geofence/property boundary lines for this customer (Note: We recommend Drawing the Geofence so the property is accurately/precisely defined and to avoid overlapping geofences; Circular is helpful with larger properties that do not have closely-adjacent properties).
15.
Set the Circular Geofence by adjusting the slider or the circle around the property on the map.
16.
Draw Polygon Geofence by clicking your mouse to add each point of the boundary.
a.
Click Reset Geofence to remove the drawn geofence and begin again.
b.
The Geofence Radius will automatically trigger jobs to start once your crews start equipment with devices installed while inside the Geofence.
17.
Add Locations Notes that your Crews need to be aware of for this property.
18.
If you service more than one property for this customer, click Add Another Location for this Customer.
19.
Click Add Contract to create a contract for this customer.
20.
Click Add Job to create a job for this customer.
21.
Click Add ODJ to create an on-demand job for this customer.
22.
Click Save to finish creating this customer.
You have now successfully created a Customer in Horizon360! Now let's go through the other options available for Managing Customers.

Managing Customers

Horizon360 makes it easy to manage your customers with all of their contact/billing information, jobs, contracts, estimates, communications & files in one central location. Let's check out some of the additional customer management features.
1.
Select Customers from the left menu to view all customers.
2.
Use the filters to narrow down your list based on:
a.
Active Status (Active vs Inactive)
b.
Customer Type (Residential vs Commercial)
c.
City of service address
d.
Service(s) provided
3.
Search for a specific customer.
4.
The red location icon indicates that this customer does not have a valid Service Address saved.
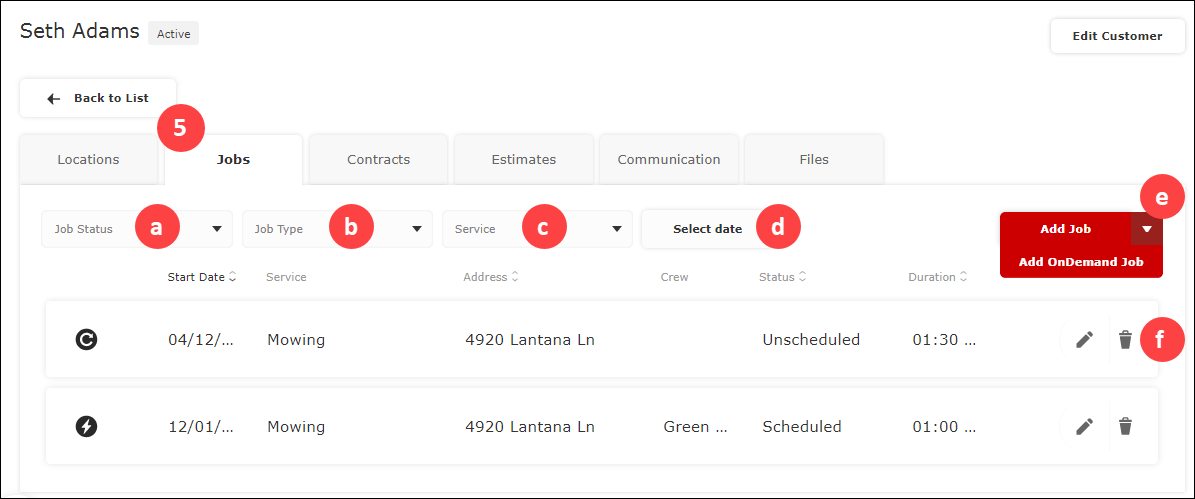
5.
Click anywhere on a customer to see a quick overview of their information.
a.
Display of customer overview/details
6.
Click the chart icon to see a specific customer's financial analytics.
7.
Click the eye/pencil icon to view/edit a customer's information, jobs, contracts, estimates, communications & files (see additional instructions below).
8.
Click the trash icon to delete the customer.
2.
Select the red down-arrow for quick Add options including:
a.
Add Customer
b.
Add Job
c.
Add OnDemand Job
d.
Add Contract
e.
Add Estimate
3.
Click Send Email to send an email to the customers you selected from your list (Note: Requires CRM Add-On or Unlimited package of Horizon360. For more information, see the Customer Communications (CRM) guide.)

Customer Details

Now let's explore deeper into an individual customer & their information. Click the view/edit icon on any customer (step 7 above).
1.
The customer's information will be displayed.
2.
Contact information and the ability to mark as active/inactive will load on the right.
3.
Click Edit Customer to edit this customer's information.
4.
The Locations tab will list the customer's billing and service addresses.
a.
Click Add to add a new location for this customer.
b.
Edit the Billing Address as needed (Note: a billing address is required).
c.
Delete, Edit or Activate/Deactivate any service addresses (Note: at least one service address is required)
5.
The Jobs tab will list all of the customer's jobs.
a.
Filter by Job Status (scheduled, skipped, completed, etc.).
b.
Filter by Job Type (job, on-demand job, contracted or routed).
c.
Filter by Service(s) assigned to the job.
d.
Filter by Date
e.
Click Add Job or Add OnDemand Job to create a new job
f.
Edit or Delete any of the jobs (Note: Jobs that have been started/completed cannot be deleted).
6.
The Contracts tab will list all contracts for this customer.
a.
Filter by Contract Status (Active, Terminated, Expired)
b.
Filter by Service(s) assigned to the contract.
c.
Click Add to create a new contract
d.
Edit, delete or view a summary of the contract (Note: Expired/completed contracts cannot be deleted)
7.
Click the Estimates tab to view all estimates for this customer.
a.
Filter by Estimates Status (Pending, Approved, Converted).
b.
Filter by Service(s) assigned to the estimate.
c.
Click Add to create a new estimate.
d.
Edit, delete or view a summary of the estimate.
8.
Click the Communications tab to see all emails for this customer.
a.
Filter by Email Type (Manual, Automated, Draft)
b.
Filter by email Date
c.
Click Send Email to send a manual email to this customer
d.
Checkmarks will indicate the status of the email; one check means the email was delivered, two checks means the email was opened by the recipient and no checks means the email was undeliverable (Note: if emails are undeliverable, contact the customer to ensure you have their correct email address).
9.
Click the Files tab to see all saved files for this customer (Note: all proof of service photos, estimates and contracts will automatically be saved to the customer's Files).
a.
Filter by File Type (Image, Document, Estimate, Contract, Proof of Service)
b.
Filter by email Date
c.
Download or Delete the file
You can now successfully create and manage your Customers in Horizon360! Check out these guides for additional tips:
If you are using QuickBooks Online, be sure to sync any new customers between your QuickBooks & Horizon360 accounts. Check out the Syncing QuickBooks Data article for more help.

Quick Links