Horizon360™ User Guide
Company Settings
This document will show how to customize various Horizon360 Settings for Services, Equipment Types, Timesheets, Billing/Subscriptions and more.
Continue below to learn about all of the different Settings options.
Profile
Let's start with your basic Company Information settings.
2.
Select Company from the left Settings menu
a.
The Company Information you filled out when first signing up will be displayed; edit any field as necessary
b.
Click Save when you are finished updating
Next let's go through Billing & Payments to see a breakdown of your current plan, card information, billing/shipping addresses and past invoices.
3.
Select Billing & Payments from the left Settings menu
4.
Select the Subscription tab to see a breakdown of the your current plan
a.
Click Change Subscription Details to see the list of features included in each plan and upgrade/downgrade as needed
b.
Click Cancel Subscription to cancel your Horizon360 subscription entirely
5.
Select the Payment tab to add/edit your saved credit card(s)
a.
Click Add Card to add a new card
6.
Select the Billing tab to add/edit your saved Billing Address(s)
a.
Click Add Address to add a new address
7.
Select the Shipping tab to add/edit your saved Shipping Address(s)
a.
Click Add Address to add a new address
8.
Select the Invoices tab to view a history of Invoices for your Horizon360 subscription
Equipment
Now we'll dive into the Equipment Settings, where you can add/edit equipment types, equipment maintenance settings and subscribed tracking devices. Let's start with Equipment Types.
Equipment Types
1.
Select Equipment Types from the left Settings menu
a.
Click Global to see the list of default pre-added Equipment Types (Hint: If there is an equipment type listed you do not offer, toggle the slider to make the equipment type Inactive)
b.
Click Company to Edit add/edit any additional Equipment Types needed
c.
Click Add New Equipment Type add a new Equipment Type
Maintenance Settings
Next we'll set up some Equipment
Maintenance Settings, which is required before assigning
Maintenance Tasks to equipment.
2.
Select Maintenance Settings from the left Settings menu
a.
View and manage your list of Maintenance Task templates (Hint: If there is a service listed you do not offer, toggle the slider to make the service Inactive)
b.
Click Add Task to create a new Maintenance Task and follow the instructions for setting up
Maintenance Task Templates to continue
Subscribed Devices
Now we will manage our Subscribed Devices, where you can add/edit your existing tracking devices and purchase additional asset and vehicle devices.
2.
Select Subscribed Devices from the left Settings menu
a.
View and manage your list of Subscribed Devices
b.
Click Add Device to purchase additional devices or add a device that was provided to you and follow the
Equipment & Devices guide for Adding Devices
c.
Click "Link" or the Edit icon to enter the device ESN and assign it to the appropriate equipment and follow the
Equipment & Devices guide for Assigning Devices
Invoicing
Now we'll dive into the Invoicing Settings, where you can enable Horizon360's online payments invoicing option, adjust invoice settings and set up tax rates.
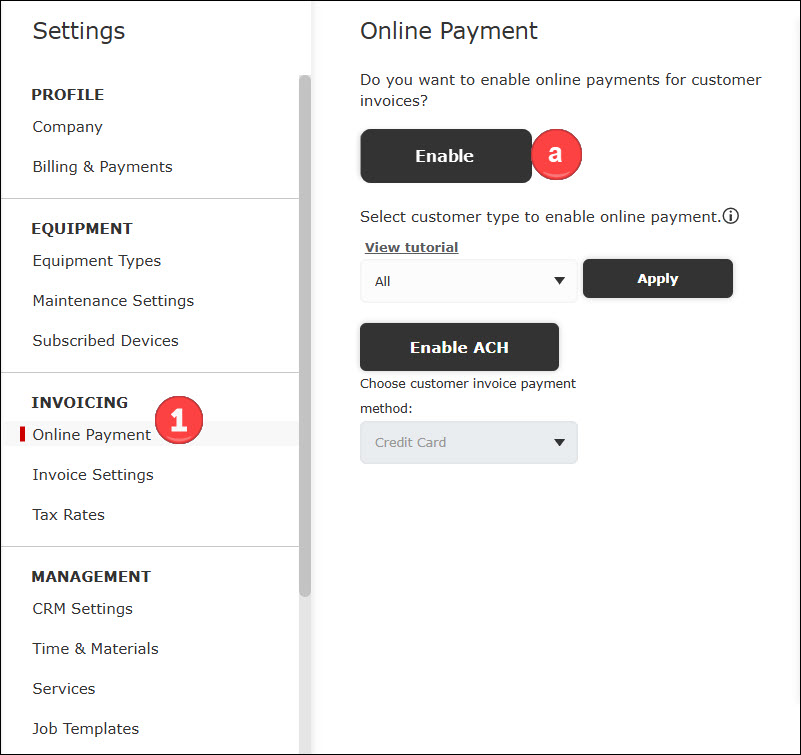
Online Payments
1.
Select Online Payments from the left Settings menu
a.
Click Enable and follow the
Online Payments instructions to begin the setting up Horizon360's invoicing option
Invoice Settings
Now we'll go over Invoice Settings, where you will set up invoice frequencies and terms.
2.
Select Invoice Settings from the left Settings menu
a.
Select the Invoice Frequency (i.e. how often invoices are generated) for residential/commercial customers (Hint: You can adjust the Invoice Frequency at both the Customer and Job levels for even more customization)
b.
If you selected a Weekly or Bi-Weekly frequency, select which day of the week you want those invoices to be generated
c.
Select the Invoice Terms that will prompt an invoice to switch to "Overdue" status for residential/commercial customers (Hint: You can adjust the Invoice Frequency at both the Customer level for even more customization)
d.
If you are using QuickBooks Online, you can sync your invoice terms directly from your QuickBooks account
Tax Rates
Last in the Invoicing Settings is the ability to create Tax Rates to apply to your jobs if desired. You can set up multiple Tax Rates, allowing you to select the applicable rate when creating jobs.
3.
Select Tax Rates from the left Settings menu
a.
View and manage your list of Tax Rates
b.
Click Add Tax Rate to create a new Tax Rate
c.
Give the Tax Rate a name
e.
Select whether it is Sales Tax or Exempt
f.
Add an optional Description
g.
Select whether this is the Default Tax Rate to be applied when creating new jobs (Hint: you can adjust the tax rate at the Job level)
h.
Save when you are finished
Management
The last section in settings is the Management Settings, which includes many different settings and templates used for creating jobs, sending emails and managing your crews.
CRM Settings
We'll start with CRM Settings, where you set up your email sending and reply-to information.
1.
Select CRM Settings from the left Settings menu
a.
Enter the Email ID1 and ID2 to create your personal email address for emails sent through Horizon360
b.
The Email Address of the Sender will be displayed based on the Email ID1 and ID2 used above
c.
Enter the Sender Name you want to be displayed for your emails (i.e. the name your customers see when they receive an email from you)
d.
Enter the Reply-To Email Address you want reply emails to be delivered to (i.e. your standard Gmail/Outlook inbox)
Time & Materials
Next we'll go through how to set up
Time & Materials to use across your jobs.
Note: Please see the Materials guide for a full walk-through of setting up Time & Materials.2.
Select Time & Materials from the left Settings menu
a.
View and edit your list of Materials, Categories, Labor Rates, Equipment Rates and Unit Measurements
b.
Import Materials via spreadsheet to save time
c.
Configure materials for your VBX Spreader (Note: Only applies to BOSS VBX Spreaders)
d.
Add new Materials as needed
Services
Next we'll go through how to customize the
Services you provide.
Note: Please see the Services guide for a full walk-through of setting up Time & Materials.2.
Select Services from the left Settings menu
a.
Click Global to see the list of default pre-added Services (Hint: If there is a service listed you do not offer, toggle the slider to make the service Inactive)
b.
Click Company to Edit add/edit any additional Services needed
c.
Click Add New Service to add a new Service
Job Templates
Next we'll go through how to set up
Job Templates to help speed up your job creation process.
Note: Please see the Job Templates guide for a full walk-through of setting up Time & Materials.2.
Select Job Templates from the left Settings menu
a.
Click Global to see the list of default pre-added Services (Hint: If there is a service listed you do not offer, toggle the slider to make the service Inactive)
b.
Click Company to Edit add/edit any additional Services needed
c.
Click Add New Service to add a new Service
You have the option to receive Notifications when your crews are behind schedule.
5.
Select Notifications from the left Settings menu
a.
Toggle the slider to turn on "crew behind schedule" Notifications
b.
Enter the number of minutes for the crew to be behind schedule to receive the notification
c.
Click Save to turn on these Notifications
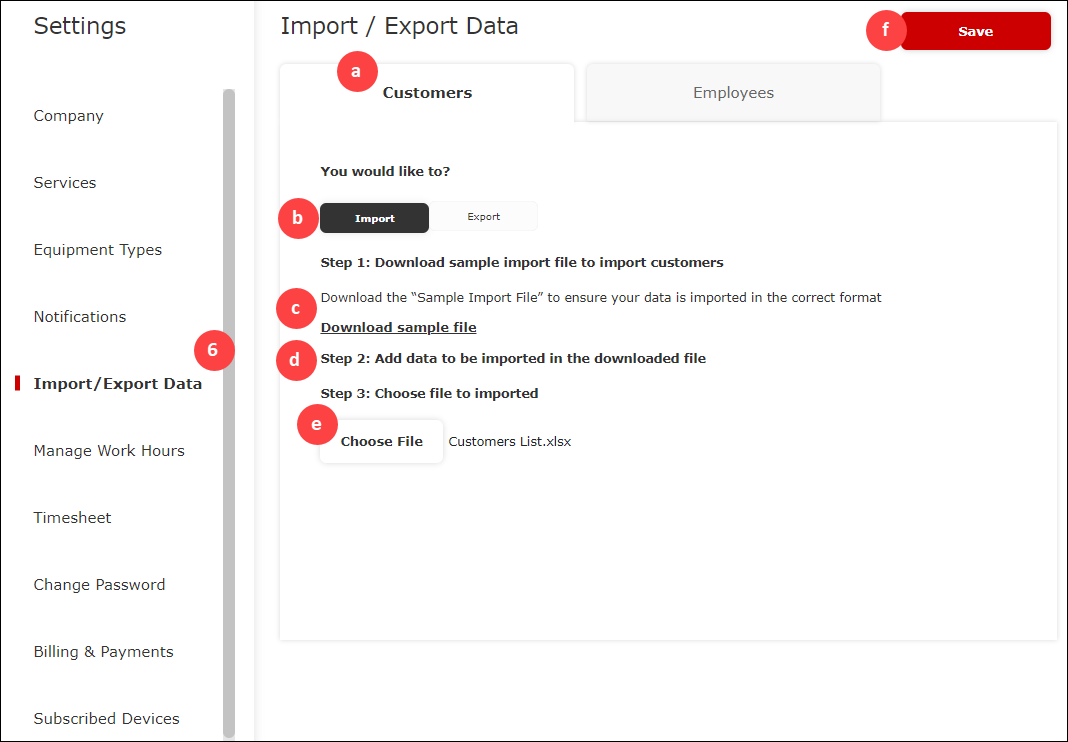
Import/Export Data
If you are not a Quickbooks Online user, you can upload your Customers and Employees to Horizon360 via Excel spreadsheet to save time instead of adding one-by-one. You can also Export your Customers & Employees to an Excel spreadsheet.
Let's start with Importing Customers.
6.
Select Import/Export Data from the left Settings menu
c.
Click "Download sample file" to ensure your data is uploaded correctly (Note: all headers must line up in the same order as the sample file and no columns can be deleted/altered for your upload to be successful.)
d.
Add your data to the Sample file or adjust your own file to match the headers/columns in the Sample file
e.
Once you have saved your spreadsheet, click Choose File to select the Excel file to Import
f.
Click Save to Import your list of Customers
You can Export your Customers list to an Excel spreadsheet at any time.
h.
Click Download Customer File and an Excel spreadsheet will be created & saved to your computer "Downloads" folder
Now let's go through Importing and Exporting Employees.
k.
Select whether you are Importing Employees or Subcontractors
l.
Click "Download sample file" to ensure your data is uploaded correctly (Note: all headers must line up in the same order as the sample file and no columns can be deleted/altered for your upload to be successful.)
m.
Add your data to the Sample file or adjust your own file to match the headers/columns in the Sample file
n.
Once you have saved your spreadsheet, click Choose File to select the Excel file to Import
o.
Click Save to Import your list of Employees or Subcontractors
You can Export your Employees & Subcontractors list to an Excel spreadsheet at any time.
q.
Select whether you are Exporting Employees or Subcontractors
r.
Click Download Employee File and an Excel spreadsheet will be created & saved to your computer "Downloads" folder
Manage Work Hours
Horizon360 allows you to change what your calendar displays.
6.
Select Manage Work Hours from the left Settings menu
a.
Set the hours for your Start of Day & End of Day (calendar will "snap" to this start & end time whenever you open the Schedule)
b.
Select which day is your Start of Week
c.
Select whether your calendar displays Weekends or not
d.
Choose whether U.S. National Holidays are displayed on your calendar or not
e.
Click Save to finish setting your Work Hours
Timesheet
If you are using Employee Timesheets in Horizon360, you will need to make sure you set your Timesheet settings to ensure your employees are paid correctly.
8.
Select Timesheet from the left Settings menu
a.
Toggle the sliders to the right to make Lunches & Breaks Paid/Billable
b.
Toggle the sliders to the left to make Lunches & Breaks Not Paid/Non-Billable
For more information on setting up & managing Timesheets, see the
Employee Timesheets help guide.
Change Password
If you need/would like to change your login password, follow the instructions below.
9.
Select Change Password from the left Settings menu
a.
Enter your Current Password
c.
Re-type your New Password
d.
Click Save to finish changing your Password
You have now completed customizing the general Settings in Horizon360.