1.
From the Customers page, click the drop down arrow next to "Add Customer" and click "Add Job" (Note: You can click on the "+" button in the top right hand corner to quick add a job)
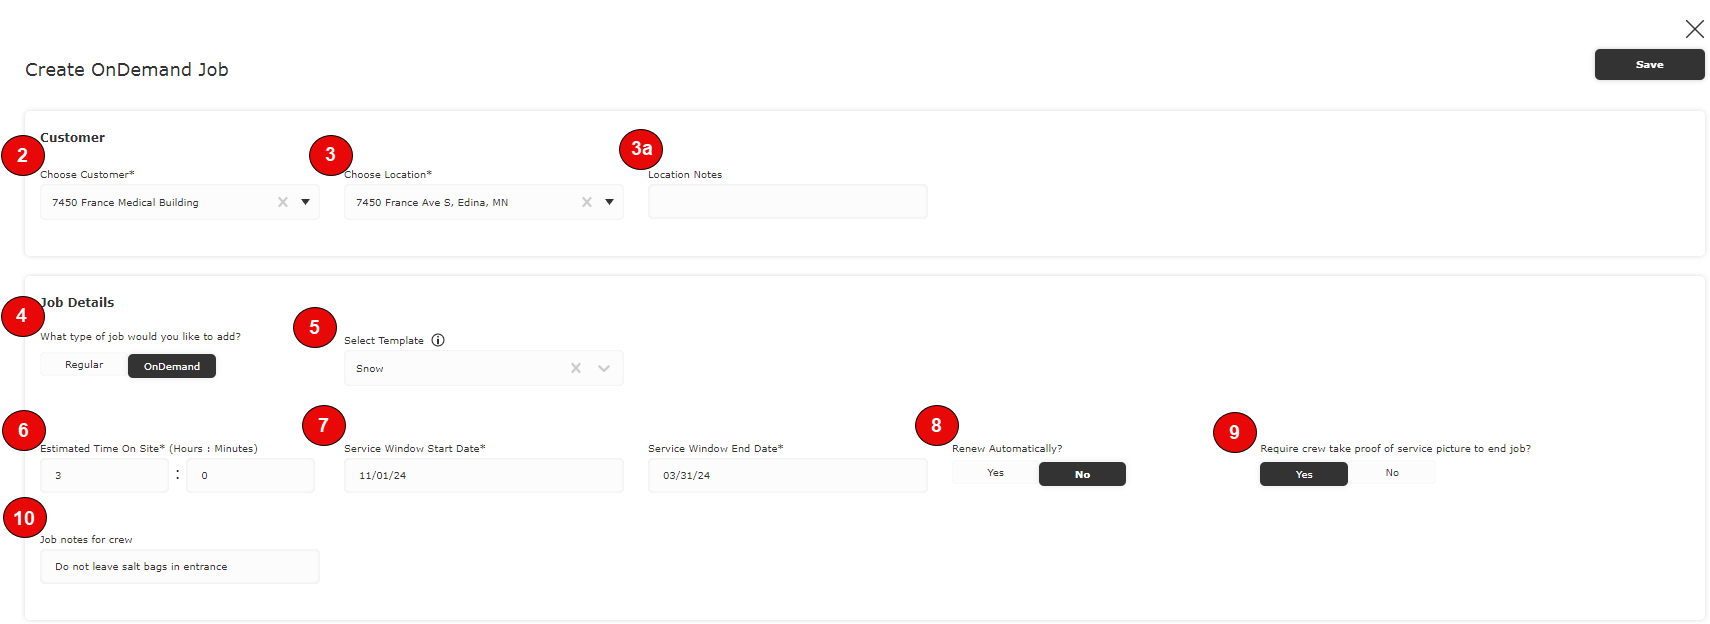
2.
Choose the customer this job is for (Note: if you previously had a customer selected when you clicked "Add Job", that customer will automatically fill in)
3.
If the customer has more than one service address, select the location for this job
a.
Location notes will be pulled from your customers profile if you entered any when setting up your customer (best used to enter gate codes, parking instructions, etc.)
5.
Use the "Select Template" to choose a pre-saved Job template that you created from your settings
6.
Enter the Estimated Time On Site
7.
Select the Service Window Start & End Date (the date range you believe you will be scheduling & completing this job)
8.
Choose whether the job Renews Automatically or not
9.
Choose if your field crews are required to take a proof of service photo
10.
Add any Notes your crew needs to be aware of for this particular job
11.
Select which Service will be performed
12.
Add a Price for this Service (Note: If you added a Default Price under the
Services Setup, that price will pre-fill here; edit as needed)
a.
Toggle between a Flat Rate or Variable Rate. Click on the information icon (i) for a detailed breakdown
13.
Click Add Another Service if you will be performing more than one service at this job visit
a.
The Total Price will be added for all Services
14.
If you already had a route created with OnDemand Jobs, you can assign this OnDemand Job to a Route
15.
Click Save to finish adding this OnDemand Job
Continue the above steps for all OnDemand Jobs you need. OnDemand Jobs can be added to the schedule one-by-one, but you can also build a Route with a list of OnDemand Jobs. When you schedule a Route, all of the Jobs within that Route will be scheduled, saving you time & effort.
(
Note: If an OnDemand Job is part of a Route, it will be listed as a stand-alone OnDemand Job as well as within the Route itself to allow you to schedule the ODJ independently of the Route if needed)
For more help creating & editing Routes, see the
Routes user guide.


